Kodi is an open-source media player which is a free application that functions as a digital media center. This application enables you to play your media, cast it between various devices, from a primary location to other devices.
How to bring IPTV channels to Kodi (New Version)
Installing Kodi is astonishingly simple. All you need to do is to download Kodi, double-click on the Kodi image and then perform the setup wizard. It’s that simple! After Kodi installed, you can download a big variety of add-ons to improve the experience. Here we will show you how to install IPTV on Kodi.
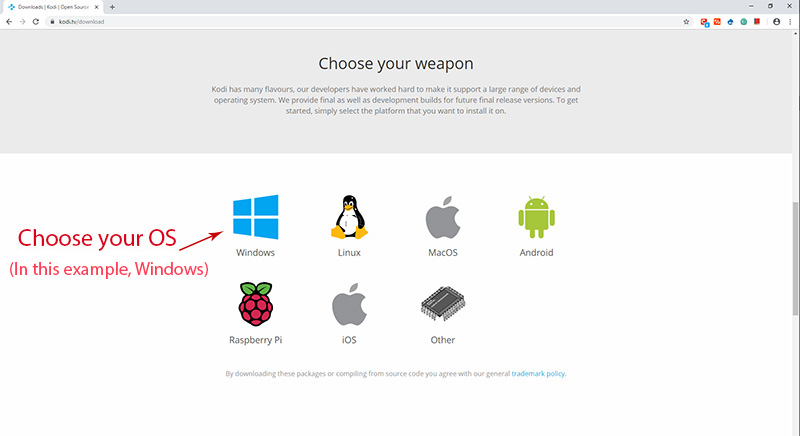
Step 1: Start by downloading Kodi based on your operating system at https://kodi.tv/download. In this case, we select "Windows".
*Please note, the installation process is very similar in all operating systems.

Step 2: Select 64 Bit or 32 Bit based on your operating system.

Step 3: Now click on "Get" and proceed to the next part.

Step 4: Now click on "Add-ons".

Step 5: Now click on "My Add-ons".

Step 6: Now select "PVR clients".

Step 7: Select "PVR IPTV Simple Client".

Step 8: Now click on "Configure".

Step 9: Now select "M3U Play List URL".

Step 10: Now paste your M3U URL.

Step 11: Now click on "XMLTV URL".

Step 12: Now paste your EPG URL.

Step 13: Click on "Enable".

Step 14: Now click on "Channels".

Step 15: Wait until you see the notification about updating channels and the installation process is over.

Conclusion
Kodi is able to play virtually every media content that you can imagine and is very customizable. Kodi allows you to change the color, skin of the user interface based on your tasteful preferences. You can also download tons of various add-ons to make your entertainment world even more remarkable.

Comments
0 comments
Please sign in to leave a comment.